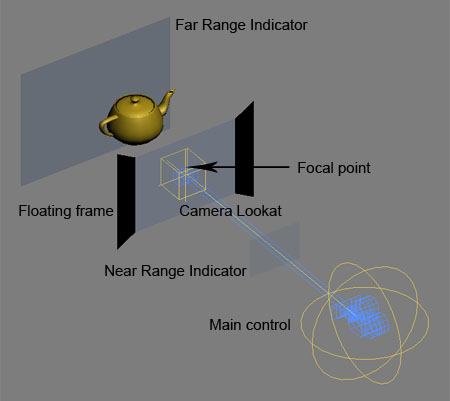
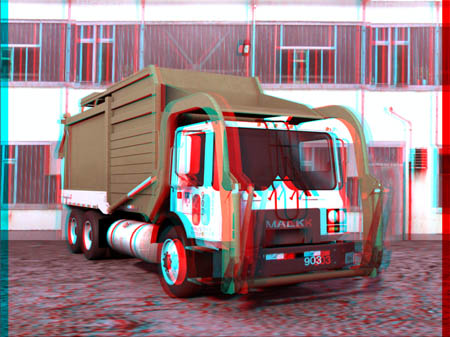
This is a modified version of the 3d camera rig we used to render the shortfilm Broken. It is based on the techniques discussed by Louis Marceaux and is capable of producing beautiful 3d imagery and a quick stereo preview. You can change and animate any aspect of the stereocameras like Interaxial and Zero Parallax. It also has a completely animatable floating frame to reduce eyestrain at the sides of the 3d image when objects come out of the screenspace.
Feature list:
- parallel output – no keystone distortion
- different preview types (anaglyph, optimized anaglyph, interlaced, side by side)
- unlocked target and focus postioning
- unlimited number of stereocameras in scene
- floating frame and floating window
- adjustable ranges based on pixel-parallaxes (NEW!)
- Vray physical camera support (NEW !)
- all parameters are animatable (NEW!)
You can get it here
newest version:
3dhippie_stereocam_v1.6.4
older versions:
3dhippie_stereoCam_v1.0
Installation
Place the 3dhippie_stereoCam_startup.ms inside …3dsmax/scripts/startup.
Next Run the 3dhippie_stereoCam.ms inside of 3dsmax to create a new camera.
Feel free to use it as much as you like. It would be really great though, if you could send me your stereo images or videos to put into a gallery. I’m especially interested in your experiences with the floating frame. Crits and comments are also extremely welcome. They will certainly improve the next versions.
Look out for upcoming video tutorials.
HOW TO USE IT
step 1 : If you already have a camera selected in your scene the script will ask if you’d like to position the stereo camera at the currently selected camera’s position which is much more useful than just running the script. The focus as well as the new lookat target’s position will be identical as the one from the original camera.
You will see something like this:

step 2: To move your camera select the main controller and move the cameras wherever you want. You can aim your camera by moving the lookat-controller. This is not the same as the focal point, which you can position manually as well. If you move the camera or the focal point you will see the distance between cameras grow or shrink, this is because the camera-rig defaults to an automatic interocular distance (default 1/30 of the distance between camera an focal point). You can change the distance manually inside of the main controller settings.
Move the camera focus where you want it. Unfortunately the focus is not animatable (you could, but the 3d will be messed up). The focal point is where objects are on the screen plane. Everything behind the focus will look like it’s behind the screen and everything in front of the focus comes out to the audience.
To see what your camera is seeing use the centerCam. The output of the other camera’s will be cropped accordingly.
step 3: make a preview render by clicking “preview render”. This will render two images, one for the left eye (cam02) and one for the right eye (cam04), and then shortly after a new image will pop up witch is the anaglyph combination of the two.
step 4: If you are happy with the results (3d is strong enough? does anything cause eystrain?) go to the renderscene dialog and set the desired framrange. Define a renderoutputfile. All images will be saved with that name plus a prefix ‘left’ or ‘right’ and a number.
step 5: switch to a compositing program to combine the movies to an anaglyph movie.

THE SETTINGS

You can find the settings and renderbuttons if you select the main control and go to the modify panel.
Field of view: sets the field of view for all cameras.
focus: shows and manipulates the distance between the focus and the camera. WARNING: not animatable
camera distance: sets/shows the distance between each camera. It operates in two modes. If auto is turned off, the cameras keep the exact distance you defined. If auto is turned on (default) the distance changes with the focal distance.
auto: If on, the distance between the cameras always stays at a given percentage of the focal distance. (e.g. focus is 90 units away, auto is set to 1/30, camdist will be 3 units).
camera seperation: A quick way to change the auto value to a preset.
camera distance:
Preview: renders two images and combines them to an anaglyph image (it’s pretty fast but depends on imagesize and and machine power).
render stereo: renders the left and righ cam and saves it at the location you defined in the render scene dialog. If finished starts rendering cam04. You can define the renderoutput filename and path in the renderscene dialog. The files will be renamed yourname_cam02_xxxx and yourname_cam04_xxxx.
render cam: renders only one camera
ranges: Indicates how far objects may extend in or out in the scene before the interoccular distance becomes hurtful to the viewers eye. They are in % of the distance between camera and focus. The ranges are only a rough reference to the animator.
floating frame: The floating frame extends the video frame into the audience. This is useful if an object penetrates the image borders. The eye can’t decide what is in front, the object or the frame, which leads to irritation and headache. You can adjust each corner of the floating frame individually. It’s important, though not to extend it to far into the audience as well. Treat it as an object itself.
UR = up right; UL = up left; DR = down right; DL = down left
LINKS
This rig is based on the stereoscopy video tutorials by Louis Marcoux (http://www.louismarcoux.com/MaxTips.htm). Thank you so much, mr. Marcoux.
another reference:
http://area.autodesk.com/download/7030
a good read about stereo 3d.
댓글